tsGL – Improvements

I worked a bit more on tsGL over the last few days, and managed to clean up a few things that were really bothering me! So far progress has been relatively smooth and it’s actually turning out quite well! So, what changed?

Lighting!
TSGL’s lighting code is much cleaner now, and seems to work pretty well! Lighting is broken down into a multi-pass system which allows for an arbitrary number of lights to be applied to each object. Take this scene, for example…

Composite.png

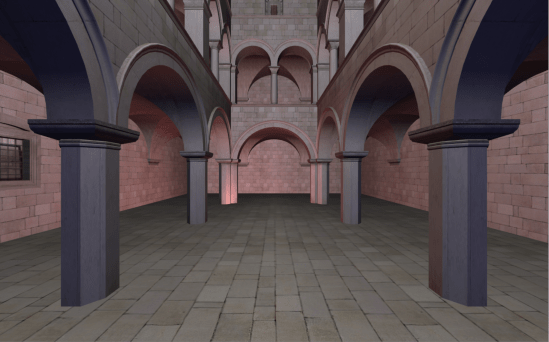
tsGL – a scene featuring three point lights. Red, blue, and white.

This scene features three realtime lights, a red light in the back left corner, a blue light behind the camera, and a white light above the scene. All of these lights are drawn as “point-lights”, meaning that they act as omnidirectional sources.

First, the scene is drawn with no lights applied. This is important to capture shader-specific details on each object, such as emissive textures, reflections, and unlit details.

Next, lights are sorted based on their “importance”. This is calculated based on distance to the object being rendered and the intensity of the light. If there’s a large, bright light shining on an object, it will be drawn first, followed by all other lights until we’ve either reached the maximum allowed number.

Then, light parameters are packed into a 4×4 matrix. This may seem odd, but it also means that all attributes of a light can be passed as a single input to the GLSL shader. This allows for a large amount of flexibility in designing shader programs, as well as the convenience of not requiring several uniform variables to be defined in each one.

The Vertex Shader calculates a set of values useful for lighting, mainly the per-vertex direction of incident light, and the attenuation of brightness over distance. These are calculated per-vertex because it reduces the number of necessary calculations significantly, and small imperfections due to interpolation over the triangle are largely imperceptible!

attenuation_withsource.png

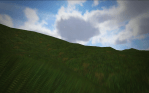
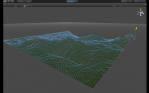
Attenuation of one of the light in the scene, visualized in false color. Ranges from red (high intensity) to green (low intensity)

By scaling the intensity of the light with the square of the distance from the source, lights will appropriately grow dimmer as they are moved farther from an object. The diffuse component of the light is also calculated per-fragment using the typical Lambertian reflectance model, and ensures that only the “light-facing side” of objects are shaded. In the above image, the intensity of a red light throughout the scene is visualized in false color, and the final diffuse light calculation is shown on the bottom right.

Awesome, but at this point our scene is just an unlit void! How do we combine the output of each light pass into a final image?

By exploiting OpenGL blend-modes, we can produce exactly the effect we want! OpenGL allows the programmer to specify an active “blend-mode”, essentially determining how new data is written to the display buffer! This is primarily used for rendering transparent objects. A window pane for instance, would need to be rendered over top of the rest of a scene, and would mix the background color with the color of the glass itself to produce a final color! This is no different!

For these lights, the OpenGL Blend Mode is set to “additive”. This will literally add together the colors of every object drawn, which in the case of lights is just what we need. Illumination is a purely additive process, and it is impossible for a light to make things darker. Because of this, simply adding the effects of several lights together will output the illuminated scene as a whole! The best part is that it works without having to pass an array of lighting information to the shader, or arbitrarily limiting the number of available lights based on hardware! While the overhead of rendering an additional pass is non-trivial, it’s a small price to pay for the flexibility allowed by this approach.

Here, we can see the influence of each of the three lights.

lights.png

The additive passes of each of the three lights featured in the scene above. By summing together these three images, we obtain the fully illuminated scene.

At the end of the day, we end up with a process that looks like this.

  1. Clear your drawing buffers. (erases the previous frame so we have a clean slate.)
  2. Draw the darkened scene.
  3. Sort the lights based on their “importance”.
  4. Set the blend mode to “additive”.
  5. For each light in the scene (in order of importance)
    1. Draw the scene again, illuminated by the light.
  6. We’re done! Display the buffer!

This solution isn’t perfect, and more powerful techniques have been described in recent years, but given the restrictions of WebGL, I find this technique to work quite well. One feature I would like to add is for the scene to only draw objects effected by a light in the additive pass, rather than the entire scene over again. This allows us to skip any calculations that would not effect an object in some way, and may increase performance, though without further testing, it’s difficult to say for sure.

Cubemaps!
This is always a fun feature to add, because it can have incredibly apparent results. Cubemaps are essentially texture-maps that exist on all sides of a cube. Rather than sampling a single point for a color, you would sample a direction, returning the color at that “angle” within the cube. By providing an image for each face, a cubemap can be built to represent lighting information, the surrounding environment, or whatever else would require a 360 texture lookup!

cubemaps_skybox

Example of a cubemap, taken from “LearnOpenGL.com”

tsGL now supports cubemaps as a specific instance of a “texture”, and they can be mapped to materials and used identically in the engine! One of the clever uses of a cubemap is called “environment mapping”, which essentially boils down to emulating reflection by looking up the color of the surrounding area in a precomputed texture. This is far more efficient than actually computing reflections dynamically, and plays much more nicely within the paradigms of traditional computer graphics! Here’s a quick example of an environment-mapped torus running in tsGL!

yakf0.gif

An environment-mapped torus, showcasing efficient reflection.

Now that cubemaps are supported, it’s also possible to make reflective and refractive materials efficiently, so shader programs can be made much more interesting within the confines of the engine!

Render Textures
Another nifty feature is the addition of render textures! By essentially binding a “camera” object to a texture, it is possible to render the scene into that texture, instead of onto the screen! This texture can then be used like any other anywhere in the drawing process, which means it’s possible to do things like draw a realtime security camera monitor in the scene, or have a mirror with realtime reflections! This can get quite costly, so it is best used sparingly, but the addition of this feature opens the door to a wide variety of other cool effects!

With the addition of both cubemaps and render textures, I hope to get shadow-mapping working in the near future, which would allow objects to appropriately cast shadows when illuminated in the scene, which was previously infeasible!

And now, the boring stuff – HTML
The custom HTML tag system has been improved immensely, and now makes much more sense. Entity tags may now be nested to define object hierarchies, and arbitrary parameters can be provided as child-tags, rather than attributes. This generally makes the scene documents far more legible, and makes adding new features in the future much easier.

Here’s a “camera” object, for example.

<tsgl-entity id=”main_camera”>
<tsgl-component type=”camera”>
<tsgl-property type=”number” name=”fov” value=”80″></tsgl-property>
<tsgl-property type=”number” name=”aspect” value=”1.6″></tsgl-property>
</tsgl-component>
<tsgl-component type=”transform”>
<tsgl-property type=”vector” name=”position” value=”0 2 0″></tsgl-property>
</tsgl-component>
</tsgl-entity>

Previously, the camera parameters would have been crammed into a single tag’s attributes, making it much more difficult to read, and much more verbose. With the addition of tsgl-property tags, attributes of each scene entity can now be specified within the entity’s definition, so all of those nice editor features like code-folding can now be exploited!

This part isn’t exactly fun compared to the rendering tests earlier, but it certainly helps when attempting to define a scene, and add new features!

That’s all for now! In the meantime, you can check out the very messy and very unstable, tsGL on GitHub if you want to try it for yourself, or experiment with new features!

tsGL – An Experiment in WebGL

dragon_turntable

For quite some time now, I’ve been extremely interested in WebGL. Realtime, hardware-accelerated rendering embedded directly in a web-page? Sounds like a fantastic proposition. I’ve dabbled quite a bit in desktop OpenGL and have grown to like it, despite its numerous… quirks… so it seemed only natural to jump head-first into WebGL and have a look around!

So, WebGL!
I was quite surprised by WebGL’s ease of use! Apart from browser compatibility (which is growing better by the week!) WebGL was relatively simple to set up. Initialize an HTML canvas context, and go to town! The rendering pipeline is nearly identical to OpenGL ES, and supports the majority of the same features as well! If you have any knowledge of desktop OpenGL, the Zero-To-Triangle time of WebGL should only be an hour or so!

Unfortunately, WebGL must be extremely compatible if it is to be deployed to popular web-browsers. This means that it has to run on pretty much anything with a graphics processor, and can’t rely on the user having access to the latest and greatest technologies! For instance, when writing the first draft of my lighting code, I attempted to implement a deferred rendering pipeline, but quickly discovered that multi-target rendering isn’t supported in many WebGL instances, and so I had to fall back to the more traditional forward rendering pipeline, but it works nonetheless!

dabrovic_pan

A textured scene featuring two point lights, and an ambient light.

Enter TypeScript!
I’ve never been particularly fond of Javascript. It’s actually quite a powerful language, but I’ve always been uncomfortable with the syntax it employs. This, combined with the lack of concrete typing can make it quite difficult to debug, and quite early on I encountered some issues with trying to multiply a matrix by undefined. By the time I had gotten most of my 3D math working, I had spent a few hours trying to find the source of some ugly, silent failures, and had decided that something needed to be done.

I was recommended TypeScript early in the life of the project, and was immediately drawn to it. TypeScript is a superset of Javascript which employs compile-time type checking, and a more familiar syntax. Best of all, it is compiled to standard minified Javascript, meaning it is perfectly compatible with all existing browsers! With minimal setup, I was able to quickly convert my existing code to TypeScript and be on my way! Now, when I attempt to take the cross product of a vector, and “Hello World”, I get a nice error in the Javascript console, instead of silent refusal.

Rather than defining an object prototype traditionally,

var MyClass = ( function() {
function MyClass( value ) {
this.property = value;
}
this.prototype.method = function () {
alert( this.property );
};
return MyClass;
})();

One can just specify a class.

class MyClass {
property : string;
constructor( value : string ) {
this.property = value;
}
method () {
alert( this.property );
}
}

This seems like a small difference, and honestly it doesn’t matter very much which method you use, but notice that property is specified to be of type string. If I were to construct an instance of MyClass and attempt to pass an integer constant, a compiler error would be thrown, indicating to me that MyClass instead requires a string. This does not effect the final Javascript, but reduces the chance of making a mistake while writing code significantly, and makes it much easier to keep your thoughts straight when coming back to a project after a few days.

Web-Components!
When trying to decide on how to represent asset metadata, I eventually drafted a variant on XML, which would allow for simple asset and object hierarchies to be defined in “scenes” that could be loaded into the engine as needed. It only took a few seconds before I realized what I had just described was essentially HTML. From here I looked into the concept of “Web-Components” a set of prototype systems that would allow for more interesting UI and DOM interactions in modern web browsers. One of the shiny new features proposed is custom HTMLElements, which allow developers to define their own HTML tags, and associated Javascript handlers. With Google Chrome supporting these fun new features, I quickly took advantage.

Now, tsGL scenes can be defined directly in the HTML document. Asset tags can be inserted to tell the engine where to find certain textures, models, and shaders. Here, we initialize a shader called “my-shader”, load an OBJ file as a mesh, and construct a material referencing a texture, and a uniform “shininess” property.

<tsgl-shader id=”my-shader” vert-src=”/shaders/test.vert” frag-src=”/shaders/test.frag”></tsgl-shader>

<tsgl-mesh id=”my-mesh” src=”/models/dragon.obj”></tsgl-mesh>

<tsgl-material id=”my-material” shader=”my-shader”>
<tsgl-texture name=”uMainTex” src=”/textures/marble.png”></tsgl-texture>
<tsgl-property name=”uShininess” value=”48″></tsgl-property>
</tsgl-material>

We can also specify our objects in the scene this way! Here, we construct a scene with an instance of the “renderer” system, a camera, and a renderable entity!

<tsgl-scene id=”scene1″>
<tsgl-system type=”renderer”></tsgl-system>

<tsgl-entity>
<tsgl-component type=”camera”></tsgl-component>
<tsgl-component type=”transform” x=”0″ y=”0″ z=”1″></tsgl-component>
</tsgl-entity>

<tsgl-entity id=”dragon”>
<tsgl-component type=”transform” x=”0″ y=”0″ z=”0″></tsgl-component>
<tsgl-component type=”renderable” mesh=”mesh_dragon” material=”mat_dragon”></tsgl-component>
</tsgl-entity>
</tsgl-scene>

Entities can also be fetched directly from the document, and manipulated via Javascript! Using document.getElementById(), it is possible to obtain a reference to an entity defined this way, and update its components! While my code is still far from production-ready, I quite like this method! New scenes can be loaded asynchronously via Ajax, generated from web-servers on the fly, or just inserted into an HTML document as-is!

Future Goals
I wanted tsGL to be a platform on which to experiment with new web-technologies, and rendering concepts, so I built it to be as flexible as possible. The engine is broken into a number of discreet parts which operate independently, allowing for the addition of cool new features like rigidbody physics, a scripting interface, or whatever else I want in the future! At the moment, the project is quite trivial, but I’m hoping to expand it, test it, and optimize it in the near future.

At the moment, things are a little rough around the edges. Assets are loaded asynchronously, and the main context just sits and complains until they appear. Rendering and updating operate on different intervals, so the display buffer tears like tissue paper. OpenGL is forced to make FAR more context switches than necessary, and my file parsers don’t cover the full format spec, but all in all, I’m quite proud of what I’ve managed to crank out in only ten or so hours of work!

If you’d like to check out tsGL for yourself, you can download it from my GitHub page!

Javascript and 3D

I know webGL already exists, and serves as a fantastic solution to integrating 3D into web pages, but I wanted to know what is actually involved in a simple 3D rendering architecture. I’ve used OpenGL quite extensively, but I thought it would be interesting to try and write it all from scratch… so I did!

Image

Meet js3D, a 3D rendering system based on the HTML5 canvas and written ENTIRELY in javascript. All matrix computations and vector transformations are hand coded. Models are specified in the typical format, vertices and triangles. Normals are automatically calculated, and used to calculate a simple, per-face color.  This system is entirely a proof of concept. It’s ugly, unoptimized, and inelegant, but it works!

Currently the worst part of the system is the rasterization code. I attempted a per-pixel rasterization system, which iterated through all points on each triangle, and colored a frame buffer based on the calculated color values for each pixel. I did this primarily because it allowed me to perform simple depth tests using a depth buffer, and the opportunity to use custom pixel shading programs. The rasterization system is COMPLETELY unoptimized at this point, and as a result, it is painfully slow. Rendering using the built in polygonal drawing tools in HTML5 Canvas is far faster, however I could not find a way to draw polygons to a second buffer or context, and as a result, depth testing quickly became impossible.

Image

It might not be a visual marvel, but it works, and I’d say it does its job fairly well, considering the tools used.

The project is available on Github here and is free to download and use!

Procedural Terrain in Unity

I was disappointed when I found out that the Unity terrain engine did not work properly on mobile devices, so I experimented with a number of different custom solutions. Over time, this project began to evolve into a fractal terrain generator, using simple noise algorithms to produce a randomly generated landscape. Next, I wrote custom shaders to blend between a stony texture and a grassy texture depending on the slope of the terrain. This worked well, but lacked the depth I felt it needed. The final step was implementing the custom shell model used to represent grass. The terrain is rendered multiple times with various vertex offsets in a multi-pass shader, with time and location based fluctuations to emulate wind, and a grass height based on slope, and some user specified parameters.

The system works fairly well, and allows for a simple procedural terrain that can be dropped into any scene.

You can experiment with this script by running the Unity Player here