Interior Mapping – Part 3

In part 2, we discussed a tangent-space implementation of the “interior mapping” technique, as well as the use of texture atlases for room interiors. In this post, we’ll briefly cover a quick and easy shadow approximation to add realism and depth to our rooms.

Hard Shadows

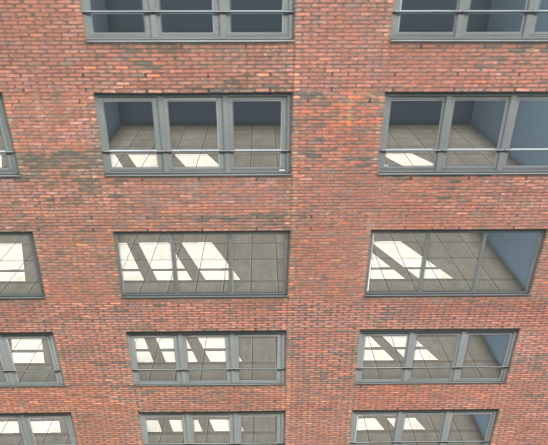
We have a cool shader which renders “rooms” inside of a building, but something is clearly missing. Our rooms aren’t effected by exterior light! While the current implementation looks great for night scenes where the lighting within the room can be baked into the unlit textures, it really leaves something to be desired when rendering a building in direct sunlight. In an ideal world, the windows into our rooms would cast soft shadows, which move across the floor as the angle of the sun changes.

Luckily, this effect is actually quite easy to achieve! Recall how we implemented the ray-box intersection in part 2. Each room is represented by a unit cube in tangent-space. The view ray is intersected with the cube, and the point of intersection is used to determine a coordinate in our room interior texture. As a byproduct of this calculation, the point of intersection in room-space is already known! We also currently represent windows using the alpha channel of the exterior texture. We can simply reuse this alpha channel as a “shadow mask”. Areas where the exterior is opaque are considered fully in shadow, since no light would enter the room through the solid wall. Areas where the exterior is transparent would be fully effected by light entering the room. If we can determine a sample coordinate, we can simply sample the exterior alpha channel to determine whether an interior fragment should be lit, or in shadow!

So, the task at hand: How do we determine the sample coordinate for our shadow mask? It’s actually trivially simple. If we cast the light ray backwards from the point of intersection between the view ray and the room volume, we can determine the point of intersection on the exterior wall, and use that position to sample our shadow texture!

Our existing effect is computed in tangent space. Because of this, all calculations are identical everywhere on the surface of the building. If we transform the incoming light direction into tangent space, any light shining into the room will always be more or less along the Z+ axis. Additionally, the room is axis-aligned, so the ray-plane intersection of the light ray and exterior wall can be simplified dramatically.

// This whole problem can be easily solved in 2D
// Determine the origin of the shadow ray. Since
// everything is axis-aligned, This is just the
// XY coordinate of the earlier ray-box intersection.
float2 sOri = roomPos.xy;

// Determine a 2D ray direction. This is the
// "XY per unit Z" of the light ray
float2 sDir = (-IN.tLightVec.xy / IN.tLightVec.z) * _RoomSize.z;

// Lastly, determine our shadow sample position. Since
// our sDir is unit-length along the Z axis, we can
// simply multiply by the depth of the fragment to
// determine the 2D offset of the final shadow coord!
float2 sPos = sOri + sDir * roomPos.z;


That’s about it! We can now scale the shadow coordinate to match the exterior wall texture, and boom! We have shadows.
Screen Shot 2019-02-27 at 11.42.23 AM.png

Soft Shadows

We have hard shadows up and running, and everything is looking great. What we’d really like is to have soft shadows. Typically, these are rendered with some sort of filtering, a blur, or a fancy technique like penumbral wedges. That’s not going to work here. We’re trying to reduce the expense of rendering interior details. We’re not using real geometry, so we can’t rely on any traditional techniques either. What we need to do is blur to our shadows, without actually performing a multi-sampled blur.

Like all good optimizations, we’ll start with an assumption. Our windows are a binary mask. They’re either fully transmissive, or fully opaque. In most cases this is how the effect will be used anyway, so the extra control isn’t a big loss. Now, with that out of the way, we can use the alpha channel of our exterior texture as something else!

Signed Distance Fields

Signed Distance Fields have been around for a very long time, and are often used to render crisp edges for low-resolution decals, as suggested in “Improved Alpha-Tested Magnification for Vector Textures and Special Effects”. Rather than storing the shadow mask itself in the alpha channel, we can store a new map where the alpha value represents the distance from the shadow mask’s borders.SDF Shadowmask.png
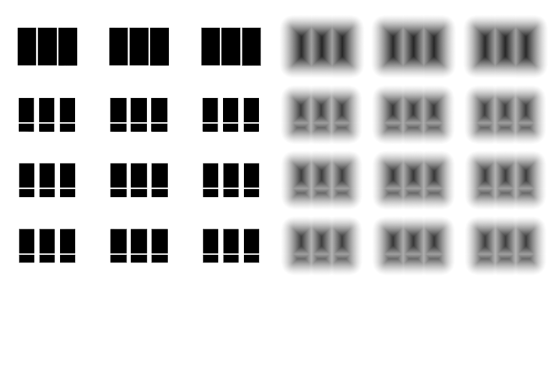
Now, a single sample returns not just whether a point is in shadow, but the distance to the edge of a shadow! If we want our shadows to have soft edges, we can switch from a binary threshold to a range of “shadow intensity”, still using only a single sample!

The smoothstep function is a perfect fit for our shadow sampling, remapping a range to 0-1, with some nice easing. We can also take the depth of the fragment within the room into account to emulate the softer shadows you see at a distance from a light source. Simply specify a shadow range based on the Z coordinate of the room point, and we’re finished!

Putting it all Together!

All together, our final shadow code looks like this.

#if defined(INTERIOR_USE_SHADOWS)
	// Cast a ray backwards, from the point in the room opposite
	// the direction of the light. Here, we're doing it in 2D,
	// since the room is in unit-space.
	float2 sOri = roomPos.xy;
	float2 sDir = (-IN.tLightVec.xy / IN.tLightVec.z) * _RoomSize.z;
	float2 sPos = sOri + sDir * roomPos.z;

	// Now, calculate shadow UVs. This is remapping from the
	// light ray's point of intersection on the near wall to the
	// exterior map.
	float2 shadowUV = saturate(sPos) * _RoomSize.xy;
	shadowUV *= _Workaround_MainTex_ST.xy + _Workaround_MainTex_ST.zw;
				
	// Finally, sample the shadow SDF, and simulate soft shadows
	// with a smooth threshold.
	fixed shadowDist = tex2D(_ShadowTex, shadowUV).a;
	fixed shadowThreshold = saturate(0.5 + _ShadowSoftness * (-roomPos.z * _RoomSize.z));
	float shadow = smoothstep(0.5, shadowThreshold, shadowDist);

	// Make sure we don't illuminate rooms facing opposite the light.
	shadow = lerp(shadow, 1, step(0, IN.tLightVec.z));

	// Finally, modify the output albedo with the shadow constant.
	iAlbedo.rgb = iAlbedo.rgb * lerp(1, _ShadowWeight, shadow);
#endif

https://gfycat.com/DangerousRectangularDungbeetle

And that’s all there is to it! Surprisingly simple, and wonderfully cheap to compute!

There’s still room for improvement. At the moment the shadow approximation supports only a single directional light source. This is fine for many applications, but may not work for games where the player is in control of a moving light source. Additionally, this directional light source is configured as a shader parameter, and isn’t pulled from the Unity rendering pipeline, so additional scripts will be necessary to ensure it stays in sync.

For deferred pipelines, it may be possible to use a multi-pass approach, and write the interior geometry directly into the G-buffers, allowing for fully accurate lighting, but shadows will still suffer the same concessions.

Still, I’m quite happy with the effect. Using relatively little math, it is definitely possible to achieve a great interior effect for cheap!

Elastic UITableView Headers (Done Right)

Elastic or “stretchy” table headers are all over the place. They add that extra juice to a polished app, and provide a nice solution for the otherwise revealing native scroll view bounce in iOS. I’m talking about one of these…

https://gfycat.com/LoathsomeIllBrocketdeer

Don’t forget that translucency thing Apple seems so fond of these days! A good header implementation should properly underlap the translucent navigation bar, and auto-adjust view margins to push content within the safe area! It’s subtle, but notice how the background image extends under the navigation bar, matching the behavior of other native views!

https://gfycat.com/LeftFarawayGull

So graceful! So fluid! Just look at that Auto Layout spring! Clearly, this is a must-have. Ask any iOS developer, and they’ll happily explain their own favorite way of implementing an elastic header. Unfortunately, many of these techniques are “icky”.

The most common implementation is to have the UITableViewController handle the layout and positioning of the header, usually in the viewDidLayoutSubviews() method. This should be setting off all kinds of alarms. While it’s a quick and easy solution, it relies on a ViewController to dictate the layout and display of data… that’s kind of the point of a View, isn’t it? The ViewController is ideally responsible for the formatting of data, so that it can later be presented in a view. By handling the table header layout in the ViewController, we’re tightly coupling the implementation of the controller with the UI design of the app. The ViewController shouldn’t care whether the header is elastic or static. All it should care about is assigning the data for the table to display.


So what’s the plan?

We need to build a nice re-usable table view which does what we want, but maintains a consistent interface with a “normal” table view. This way, it can be a drop-in replacement for all the UITableView instances in your app. ViewControllers shouldn’t care about layout.

Therefore, we need a UITableView subclass which…

  • features an elastic header.
  • has an identical interface to UITableView
  • plays nice with UIKit (nav-bars, safe area, etc.)
  • can be loaded from a Storyboard

Let’s start off nice and simple. A new TableView subclass.

import Foundation
import UIKit

class ElasticHeaderTableView : UITableView {
    override func layoutSubviews() {
        // Obviously, something goes here!
    }
}

We’ve immediately hit a problem! Table views already have a tableHeaderView property which has all sorts of fancy logic attached to it! Any UIView you assign to this field will mess with the content insets, tweak the scroll rect, and generally wreak havoc on our layout! Since we’re implementing custom layout logic, we can’t just update the rect of this view! We also can’t ignore it, since our target was to provide an identical interface to a standard UITableView!

This is a great opportunity to do some overriding! How about we write a new get/set, and forward the value to a new field? This effectively allows us to bypass the superclass’s implementation, since (as far as the Obj-C class definition is concerned), the stored value in the synthesized tableHeaderView field will always be nil.

override var tableHeaderView: UIView? {
    set {
        _elasticHeaderView = newValue
    }
    get {
        return _elasticHeaderView
    }
}

private var _elasticHeaderView: UIView? {
    willSet {
        _elasticHeaderView?.removeFromSuperview()
    }
    didSet {
        if let headerView = _elasticHeaderView {
            addSubview(headerView)
            bringSubviewToFront(headerView)
            
            updateHeaderMargins()
            let headerSize = headerView.systemLayoutSizeFitting(UIView.layoutFittingCompressedSize)
            contentInset.top = headerSize.height - safeAreaInsets.top
            contentOffset.y = -headerSize.height
        }
    }
}

private func updateHeaderMargins () {
    _elasticHeaderView?.directionalLayoutMargins = NSDirectionalEdgeInsets(
        top: safeAreaInsets.top,
        leading: safeAreaInsets.left,  
        bottom: 0,
        trailing: safeAreaInsets.right)
}

You’ll notice some observer blocks attached to the _elasticHeaderView. The first is a willSet. This will remove the existing header from the view hierarchy, so we don’t leave it around if the header view is changed! The second is a didSet block. This will add the new header subview, calls a a method called “updateHeaderMargins”, and adjusts the content inset for the tableView to account for the new header height, so our table view rows don’t overlap the header. updateHeaderMargins() will simply copy the safe area of the tableView into the header’s directional layout margins. This allows constraints to the view margin to factor in the portion of the tableView obscured by nav bars, or the iPhone X “notch”. While not “necessary” for many applications, this makes life a lot easier as you start using the class.

Alright, now we need to actually put things where they need to go! Every time the tableView is adjusted using Auto Layout or the scroll view scrolls, the elastic header must be adjusted to account for the new space. Let’s define a new function for that.

override var contentOffset: CGPoint {
    didSet {
        layoutHeaderView()
    }
}

override func layoutSubviews() {
    super.layoutSubviews()
    layoutHeaderView()
}

private func layoutHeaderView () {
    updateHeaderMargins()
    
    if let headerView = _elasticHeaderView {
        let headerSize = headerView.systemLayoutSizeFitting(UIView.layoutFittingCompressedSize)
        let stretch = -min(0, contentOffset.y + headerSize.height)
        let headerRect = CGRect(
            x: 0,
            y: -headerSize.height - stretch,
            width: bounds.width,
            height: headerSize.height + stretch)
        
        headerView.frame = headerRect
        
        contentInset.top = headerSize.height - safeAreaInsets.top
    }
}

Here, we override layoutSubviews and attach an observer to the contentOffset parameter. This allows us to listen for changes to the scroll position, and the view layout without blocking the delegate outlet of the view, or requiring a viewController’s didLayout method. Then, the layoutHeaderView method does the majority of the work.

  1. First, we update the header margins. It’s possible that the safe area has changed since the last update, and it’s important to keep the margins current.
  2. Next, calculate the ideal size of the header using systemLayoutSizeFitting. This allows headers to be defined with Auto Layout constraints (which is super nice)
  3. Next, calculate the “stretch”. This is the distance the header must expand beyond its ideal height to account for the scroll view’s scroll position.
  4. Calculate a rect using all of these properties, pushing the header upward beyond the scroll view’s content. This allows the header to extend above the top of the scroll view. Assigning this new rect to the header view’s frame.
  5. Lastly, update the content inset of the scroll view to account for the possibility that a safe area has changed.

Now, we have a UITableView subclass which will automatically position a stretchy Auto Layout header whenever the view changes or is scrolled! The last thing to account for is storyboard compatibility! This is a nice easy fix, since we’ve already got a convenient method for it!

override func awakeFromNib() {
    super.awakeFromNib()
    
    let header = super.tableHeaderView
    super.tableHeaderView = nil
    _elasticHeaderView = header
}

When the view loads from a Nib or Storyboard, fetch the tableHeaderView from the superclass, set it to nil, and push the view into our internal header view field. This last piece of the puzzle lets our custom UITableView subclass play nicely with Storyboards. Dragging and dropping a new UIView to the top of an elastic table view will automatically assign the header, just like any old view!

https://gfycat.com/HeartyWastefulBanteng


And there you have it!

With just under 100 lines of Swift, you can create an entirely self-contained UITableView with an elastic header!

It’s a drop-in replacement for any table view in your project, plays nice with Auto Layout, can be configured and loaded from a Nib or Storyboard, and requires no special treatment on the part of your ViewController!