Interior Mapping – Part 3

In part 2, we discussed a tangent-space implementation of the “interior mapping” technique, as well as the use of texture atlases for room interiors. In this post, we’ll briefly cover a quick and easy shadow approximation to add realism and depth to our rooms.

Hard Shadows

We have a cool shader which renders “rooms” inside of a building, but something is clearly missing. Our rooms aren’t effected by exterior light! While the current implementation looks great for night scenes where the lighting within the room can be baked into the unlit textures, it really leaves something to be desired when rendering a building in direct sunlight. In an ideal world, the windows into our rooms would cast soft shadows, which move across the floor as the angle of the sun changes.

Luckily, this effect is actually quite easy to achieve! Recall how we implemented the ray-box intersection in part 2. Each room is represented by a unit cube in tangent-space. The view ray is intersected with the cube, and the point of intersection is used to determine a coordinate in our room interior texture. As a byproduct of this calculation, the point of intersection in room-space is already known! We also currently represent windows using the alpha channel of the exterior texture. We can simply reuse this alpha channel as a “shadow mask”. Areas where the exterior is opaque are considered fully in shadow, since no light would enter the room through the solid wall. Areas where the exterior is transparent would be fully effected by light entering the room. If we can determine a sample coordinate, we can simply sample the exterior alpha channel to determine whether an interior fragment should be lit, or in shadow!

So, the task at hand: How do we determine the sample coordinate for our shadow mask? It’s actually trivially simple. If we cast the light ray backwards from the point of intersection between the view ray and the room volume, we can determine the point of intersection on the exterior wall, and use that position to sample our shadow texture!

Our existing effect is computed in tangent space. Because of this, all calculations are identical everywhere on the surface of the building. If we transform the incoming light direction into tangent space, any light shining into the room will always be more or less along the Z+ axis. Additionally, the room is axis-aligned, so the ray-plane intersection of the light ray and exterior wall can be simplified dramatically.

// This whole problem can be easily solved in 2D
// Determine the origin of the shadow ray. Since
// everything is axis-aligned, This is just the
// XY coordinate of the earlier ray-box intersection.
float2 sOri = roomPos.xy;

// Determine a 2D ray direction. This is the
// "XY per unit Z" of the light ray
float2 sDir = (-IN.tLightVec.xy / IN.tLightVec.z) * _RoomSize.z;

// Lastly, determine our shadow sample position. Since
// our sDir is unit-length along the Z axis, we can
// simply multiply by the depth of the fragment to
// determine the 2D offset of the final shadow coord!
float2 sPos = sOri + sDir * roomPos.z;


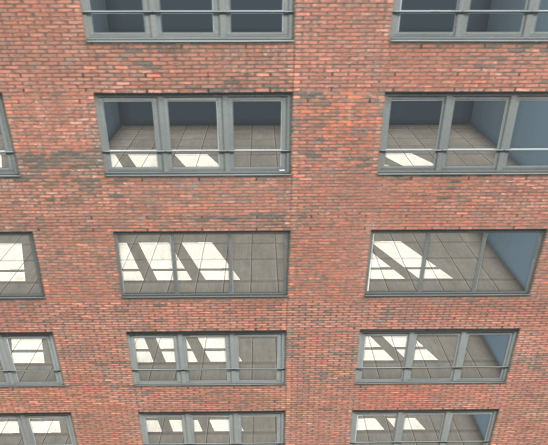
That’s about it! We can now scale the shadow coordinate to match the exterior wall texture, and boom! We have shadows.

Screen Shot 2019-02-27 at 11.42.23 AM.png

Soft Shadows

We have hard shadows up and running, and everything is looking great. What we’d really like is to have soft shadows. Typically, these are rendered with some sort of filtering, a blur, or a fancy technique like penumbral wedges. That’s not going to work here. We’re trying to reduce the expense of rendering interior details. We’re not using real geometry, so we can’t rely on any traditional techniques either. What we need to do is blur to our shadows, without actually performing a multi-sampled blur.

Like all good optimizations, we’ll start with an assumption. Our windows are a binary mask. They’re either fully transmissive, or fully opaque. In most cases this is how the effect will be used anyway, so the extra control isn’t a big loss. Now, with that out of the way, we can use the alpha channel of our exterior texture as something else!

Signed Distance Fields

Signed Distance Fields have been around for a very long time, and are often used to render crisp edges for low-resolution decals, as suggested in “Improved Alpha-Tested Magnification for Vector Textures and Special Effects”. Rather than storing the shadow mask itself in the alpha channel, we can store a new map where the alpha value represents the distance from the shadow mask’s borders.SDF Shadowmask.png

Now, a single sample returns not just whether a point is in shadow, but the distance to the edge of a shadow! If we want our shadows to have soft edges, we can switch from a binary threshold to a range of “shadow intensity”, still using only a single sample!

The smoothstep function is a perfect fit for our shadow sampling, remapping a range to 0-1, with some nice easing. We can also take the depth of the fragment within the room into account to emulate the softer shadows you see at a distance from a light source. Simply specify a shadow range based on the Z coordinate of the room point, and we’re finished!

Putting it all Together!

All together, our final shadow code looks like this.

#if defined(INTERIOR_USE_SHADOWS)
	// Cast a ray backwards, from the point in the room opposite
	// the direction of the light. Here, we're doing it in 2D,
	// since the room is in unit-space.
	float2 sOri = roomPos.xy;
	float2 sDir = (-IN.tLightVec.xy / IN.tLightVec.z) * _RoomSize.z;
	float2 sPos = sOri + sDir * roomPos.z;

	// Now, calculate shadow UVs. This is remapping from the
	// light ray's point of intersection on the near wall to the
	// exterior map.
	float2 shadowUV = saturate(sPos) * _RoomSize.xy;
	shadowUV *= _Workaround_MainTex_ST.xy + _Workaround_MainTex_ST.zw;
				
	// Finally, sample the shadow SDF, and simulate soft shadows
	// with a smooth threshold.
	fixed shadowDist = tex2D(_ShadowTex, shadowUV).a;
	fixed shadowThreshold = saturate(0.5 + _ShadowSoftness * (-roomPos.z * _RoomSize.z));
	float shadow = smoothstep(0.5, shadowThreshold, shadowDist);

	// Make sure we don't illuminate rooms facing opposite the light.
	shadow = lerp(shadow, 1, step(0, IN.tLightVec.z));

	// Finally, modify the output albedo with the shadow constant.
	iAlbedo.rgb = iAlbedo.rgb * lerp(1, _ShadowWeight, shadow);
#endif

And that’s all there is to it! Surprisingly simple, and wonderfully cheap to compute!

There’s still room for improvement. At the moment the shadow approximation supports only a single directional light source. This is fine for many applications, but may not work for games where the player is in control of a moving light source. Additionally, this directional light source is configured as a shader parameter, and isn’t pulled from the Unity rendering pipeline, so additional scripts will be necessary to ensure it stays in sync.

For deferred pipelines, it may be possible to use a multi-pass approach, and write the interior geometry directly into the G-buffers, allowing for fully accurate lighting, but shadows will still suffer the same concessions.

Still, I’m quite happy with the effect. Using relatively little math, it is definitely possible to achieve a great interior effect for cheap!

GPU Isosurface Polygonalization

Isosurfaces are extremely useful when it comes to data visualization. From medical imaging to fluid flow analysis, they are an excellent tool for understanding complex volumetric data. Games have also adopted some of these techniques for their on purposes From the more rigid implementation in the ubiquitous game Minecraft to the Gels in Portal 2, these techniques serve the same basic purpose.

I wanted to try my hand at a general-purpose implementation, but before we dive into things, we must first answer a few basic questions.

What is an isosurface?

An isosurface can be thought of as the solution of a continuous function which produces a constant output in 3D. If you’re visualizing an electromagnetic field for example, you might generate an isosurface for a given potential, so you can easily determine its overall shape. This technique can be applied to other arbitrary values as well. Given CT scan data, a radiologist could construct an isosurface at the density of a specific type of tissue, extracting a 3D representation of bones or organs to view them separately, rather than having to manipulate a less intuitive stack of images.

What will we use this system for?

I don’t work in the medical field, nor would I trust the accuracy of my implementation when it comes to making a diagnosis. I work in entertainment and computer graphics, and as you would imagine, the requirements are quite different. Digital artists can already craft far better visuals than any procedure yet known; the real challenge is dynamic data. Physically simulated fluids, player-modifiable terrain, mechanics such as these present a significant challenge for traditional artists! What we really need is a generalized system for extracting and rendering isosurfaces in real time to fill in the gaps.

What are the requirements for such a system?

Given our previous use case, we can derive a few basic requirements. In no particular order…

  1. The system must be intuitive. Designers have other things to do besides tweaking simulation volumes and fiddling with configurations.
  2. The system must be flexible. If someone suggests a new mechanic which relies heavily on procedural geometry, it should be easy to get up and running.
  3. The system must be compatible. The latest experimental extensions are fun, but if you want to release something that anyone can enjoy, it needs to run on 5 year old hardware.
  4. The system must be fast. At 60 fps, you only have 16ms to render everything in your game. We can’t spend 10 of that drawing a special effect.

Getting Started!

Let’s look at requirement no. 4 first. Like many problems in computing, surface polygonalization can be broken down into repeated instances of much smaller problems. At the end of the day, the desired output is a series of interconnected polygons which appear to make up a complex surface. If each of these component polygons is accounted for separately, we can dramatically reduce the scope of the problem. Instead of generating a polygonal surface, we are now generating a single polygon, which is a much less daunting task. As with any discretization process, it is necessary to define a regular sample interval at which our continuous function will be evaluated. In the simplest 3D case, this will take the form of a regular grid of cells, and each of these cells will form a single polygon. Suddenly, this polygonalization process becomes massively parallel. With this new outlook, the problem becomes a perfect fit for standard graphics hardware!

For compatibility, I chose to implement this functionality in the Geometry Shader stage of the rendering pipeline, as it allows for the creation of arbitrary geometry given some basic input data. A Compute Shader would almost definitely be a better option in terms of performance and maintainability, but my primary development system is OSX, which presents a number of challenges when it comes to the use of Compute Shaders. I intend to update this project in the future, once Compute Shaders become more common.

If the field is evaluated at a number of regular points and a grid is drawn between them, we can construct a set of hypothetical cubes with a single sample at each of its 8 vertices. By comparing the values at each vertex, it is trivial to determine the plane of intersection between the theoretical isosurface and the cubic sample volume. If properly evaluated, the local solutions for each sample volume will form integral parts of the global surface implicitly, without requiring any global information.

This is the basic theory behind the ubiquitous Marching Cubes algorithm, first published in 1987 and still commonly used today. While it is certainly battle-tested, there are a number of artifacts in the output geometry that can make surfaces appear rough. The generated triangles are also often non-uniform and narrow, leading to additional artifacts later in the rendering process. Perhaps a more pressing issue is the sheer number of cases to be evaluated. For every sample cell, there are 256 possible planar intersections. The fantastic implementation by Paul Bourke wisely recommends the use of a look-up table, pre-computing these cases. While this may work well in traditional implementations, it crumbles under the parallel architecture of modern GPUs. Graphics hardware tends to excel at executing large batches of identical instructions, but begins to falter as soon as complex conditional branching is involved and operations have to be evaluated individually. In my tests, I found that the look-up tables performed no better, if not worse than explicit evaluation, as the complier could not easily expand and unroll the program flow, and evaluation could not be easily batched. Bearing this in mind, we ideally need to implement a method with as few logical branches as possible.

Marching Tetrahedra is a variant of the Marching Cubes algorithm which divides each cube into 5 (or 6 for a slightly different topology) tetrahedra. By limiting our integral sample volume to four vertices instead of 8, the number of possible cases drops to 16. In my tests, I got a 16x performance improvement using this technique (though realized savings are heavily dependent on the hardware used), confirming our suspicions. Unfortunately, marching tetrahedra can have some strange surface features, and has a number of artifacts of its own, especially with dynamic sampling grids.

Because of this, I ended up settling on naive surface nets, a simple dual method which generates geometry spanning multiple voxel sample volumes. An excellent discussion of the differences between these three meshing algorithms can be found here. Perhaps my favorite advantage of this method is the relative uniformity of the output geometry. Surface nets tend to be smooth surfaces comprised of quads of relatively equal size. In addition, I find it easier to comprehend and follow than other meshing algorithms, as its use of look-up-tables, and possible cases is fairly limited.

Implementation Details

Isosurface_Sample.png

The sample grid is actually defined as a mesh, with a single disjoint vertex placed at each integral sample coordinate. These vertices aren’t actually drawn, but instead are used as input data to a series of shaders. Therefore, the shader can be considered to be executed “per-voxel”, with its only input being the coordinate of the minimum bounding corner. One disadvantage commonly seen in similar systems is a fundamental restriction on surface resolution due to a uniform sample grid. In order to skirt around this limitation, meshing is actually performed. In projected space, rather than world space, so each voxel is a truncated frustum similar to that of the camera, rather than a cube. This not only eliminates a few extra transformations in the shader code, but provides LoD implicitly by ensuring each output triangle is of a fixed pixel size, regardless of its distance to the camera.

Once the sample mesh was created, I used a simple density function for the potential field used by this system. It provides a good amount of flexibility, while still being simple to comprehend and implement. Each new source of “charge” added to the field would contribute additively to the overall potential.  However, this quickly raises a concern! Each contributing charge must be evaluated at all sample locations, meaning our shader must, in some way, iterate through all visible charges! As stated earlier, branching and loops which cannot be unrolled can cause serious performance hiccups on most GPUs!

While I was at it, I also implemented a Vertex Pre-pass. Due to the nature of GPU parallelism, each voxel is evaluated in complete isolation. This has the unfortunate side-effect of solving for each voxel vertex position up to 6 times (once for each neighboring voxel). The surface net algorithm utilizes an interpolated surface vertex position, determined from the intersections of the surface and the sample volume. This interpolation can get expensive if repeated 6 times more than necessary! To remedy this, I instead do a pre-pass calculating the interpolated vertex position, and storing it as a normalized coordinate within the voxel in the pixel color of another texture. When the geometry stage builds triangles, it can simply look up the normalized vertex positions from this table, and spit them out as an offset from the voxel min coordinate!

The geometry shader stage is then fairly straightforward, reading in vertex positions, checking the case of the input voxel, looking up the vertex positions of its neighbors, and bridging the gap with a triangle.

Was it worth it?

Short answer, no.

I am extremely proud of the work I’ve done, and the end result is quite cool, but it’s not a solution I would recommend in a production setting. The additional complexity far outweighs any potential performance benefit, and maintainability, while not terrible, takes a hit as well. In addition, the geometry shader approach doesn’t work nearly as well as I had hoped. Geometry shaders are notoriously cache-unfriendly, and my implementation is no exception. Combine this with the rather unintuitive nature of working with on-GPU procedural geometry in a full-scale project, and you’ve got yourself a recipe for very unhappy engineers.

I think the concept of on-GPU surface meshing is fascinating, and I’m eager to look into Compute Shader implementations, but as it stands, the geometry stage is not the way to go.

I’ve made the source available on my GitHub if you’d like to check it out!

Messing With Shaders – Realtime Procedural Foliage


ivy_close.png
The programmable rendering pipeline is perhaps one of the largest advances in the history of realtime computer graphics. Before its introduction, graphics libraries like OpenGL and DirectX were limited to the “fixed function pipeline”, a programmer would shove in geometric data, and the application would draw it however it saw fit. Developers had little to no control over the output of their application beyond a few “render mode” settings. This was fine for rendering relatively simple scenes, solid objects, and simplistic lighting, but as visual fidelity increased and hardware become more powerful it quickly became necessary to allow for a more customizable rendering.

The process of rendering a 3D object in the modern programmable pipeline is typically broken down into a number of steps. Data is copied into fast-access graphics memory, then transformed through a series of stages before the graphics hardware eventually rasterizes that data to the display. In its most basic form, there are two of these stages the developer can customize. The “Vertex Program” manipulates data on a per-vertex level, such as positions and texture coordinates, before handing the results on to the “Fragment Program”, which is responsible for determining the properties of a given fragment (like a pixel containing more than just color information). The addition of just these two stages opened the floodgates for interesting visual effects. Approximating reflections for metallic objects, cel-shading effects for cartoon characters, and more! Since then, even more optional stages have been inserted into the pipeline for an even greater variety of effects.

I’ve spent a considerable amount of time experimenting with vertex and fragment programs in the past, but this week I decided to spend a few hours working with the other, less common stages, mainly “Geometry Programs”. Geometry programs are a more recent innovation, and have only began to see extensive use in the last decade or so. They essentially allow developers to not only modify vertex data as it’s received, but to construct entirely new vertices based on the input primitives (triangles, quads, etc.) As you can easily imagine, this presents incredible potential for new effects, and is something I personally would like to become more experienced with.

In four or five hours, I managed to write a relatively complex effect, and the rest of this post will detail, at a high level, what I did to achieve it.

ivy_distant.png

Procedurally generated geometry for ivy growing on a simple building.

This is my procedural Ivy shader. It is a relatively simple two-pass effect which will apply artist-configurable ivy to any surface. What sets this effect apart from those I’ve written in the past is that it actually constructs new geometry to add 3D leaves to the surface extremely efficiently.

One of the major technical issues when it comes to rendering things like foliage is that the level of geometric detail required to accurately represent leaves is quite high. While a digital environment artist could use a 3D modeling program to add in hundreds of individual leaves, this is not necessarily a good use of their time. Furthermore, it quickly becomes unmaintainable if anyone decides that the position, density, or style of foliage should change in the future. I don’t know about you, but I don’t want to be the one to have to tell a team of environment artists that all of the ivy in an entire game needs to be slightly different. In this situation, the key is to work smarter, not harder. While procedural art is often controversial in the game industry, I think most developers would agree that artist-directed procedural techniques are an invaluable tool.

Ivy_Shader_Steps.png
First and foremost, my foliage effect is composed of two separate rendering passes. First, a triplanar-mapped base texture is blended onto the object based on the desired density of the ivy. This helps to make the foliage feel much more dense, and helps to hide the seams where the leaves meet the base geometry.

Next in a second rendering pass, the geometry program transforms every input triangle into a set of quads lying on that triangle with a uniform, psuedo-random distribution. First, it is necessary to determine the number of leaf quads to generate. In order to maintain a consistent density of leaf geometry, the surface area of the triangle is calculated quickly using the “half cross-product formula”, and is then multiplied by the desired number of leaves per square meter of surface area. Then, for each of these leaves, a random sample point on the triangle is picked, and a triangle strip is emitted. It does this by sampling a noise function seeded with the world-space centroid of the triangle and the index of the leaf quad being generated. These noise values are then used to generate barycentric coordinates, which in turn are used to interpolate the position and normal of the triangle at that point, essentially returning a random world-space position and its corresponding normal vector.

Now, all that’s needed is to determine the orientation of the leaf, and output the correct triangle-strip primitive. Even this is relatively simple. By using the world-space surface normal and world “up” vector, a simple “change of vector basis” matrix is constructed. Combining this with a slightly randomized scale factor, and a small offset to orientation (to add greater variety to patches of leaves), we can transform normalized quad vertices into the exact world-space positions we want for our leaves!

...

// Defines a unit-size square quad with its base at the origin. doing
// this allows for very easy scaling and positioning in the next steps.
static const float3 quadVertices[4] = {
   float3(-0.5, 0.0, 0.0),
   float3( 0.5, 0.0, 0.0),
   float3(-0.5, 0.0, 1.0),
   float3( 0.5, 0.0, 1.0)
};

...

// IN THE GEOMETRY SHADER
// Change of basis matrix converts from XYZ space to leaf-space
float3x3 leafBasis = float3x3(
   leafX.x, leafY.x, leafZ.x,
   leafX.y, leafY.y, leafZ.y,
   leafX.z, leafY.z, leafZ.z
);

// constructs a random rotation matrix from Euler angles in the range 
// (-10,10) using wPos as a seed value.
float3x3 leafJitter = randomRotationMatrix(wPos, 10);

// Combine the basis matrix by the random rotation matrix to get the
// complete leaf transformation. Note, we could use a 4x4 matrix here
// and incorporate the translation as well, but it's easier to just add
// the world position as an offset in the final step.
float3x3 leafMatrix = mul(leafBasis, leafJitter);

// lastly, we can just output four vertices in a triangle strip
// to form a simple quad, and we'll be on our merry way.
for ( int i = 0; i < 4; i ++ ) {
   FS_INPUT v;
   v.vertex = UnityWorldToClipPos( 
      float4( mul(leafMatrix, quadVertices[i] * scale), 1) + wPos 
   );
   triStream.Append(v);
}

At this point, the meat of the work is done! We’ve got a geometry shader outputting quads on our surface. The last thing needed is to texture them, and it works!

Configuration!

I briefly touched on artist-configurable effects in the introduction, and I’d like to quickly address that too. I opted to go with the simplest solution I could think of, and it ended up being incredibly effective.

venus_vertex_weights.png

Configuring procedural geometry using painted vertex weights.

The density and location of ivy is controlled through painted vertex-colors. This allows artists to simply paint sections of their model they would like to be covered in foliage, and the shader will use this to weight the density and distribution of the procedural geometry. This way, an environment artist could use the tools they’re familiar with to quickly sketch out what parts of a model they would like to be effected by the shader. It will take an experienced artist less than a minute to get a rough draft working in-engine, and changes to the foliage can be made just as quickly!

At the moment, only the density of the foliage is mapped this way (All other parameters are uniform material properties), but I intend to expand the variety of properties which can be expressed this way, allowing for greater control over the final look of the model.

TODOs!

This ended up being an extremely informative project, but there are many things still left to do! For one, the procedural foliage does not take lighting into account. I built this effect in the Unity game engine, and opted out of using the standard “Surface Shader” code-generation system, which while very useful in 99% of cases, is extremely limiting in situations such as this. I would also like to improve the resolution of leaf geometry, applying adaptive runtime tessellation to the generated primitives in order to give them a slight curve, rather than displaying flat billboards. Other things, such as color variation on leaves could go a long way to improving the effect, but for now I’m quite satisfied with how it went!

Whelp, on to the next one!


Heatwave

A few years back I worked on a Unity engine game for a school project, called “Distortion”. In this game, the player has a pair of scifi-magic gloves that allows him or her to bend space. I ended up writing some really neat visual effects for the game, but it never really went anywhere. This afternoon I found a question from a fellow Unity developer, asking how to make “heat ripple” effects for a jet engine, and I decided to clean up the visual effects and package them into a neat project so that others could use it too!

And so, Heatwave was born.

heatwave_flame_demo_gif

Heatwave is a post-processing effect for the Unity game engine that takes advantage of multi-camera rendering to make cool distortion effects easy! It does this by rendering a full-screen normal map in the scene using a specialized shader. This shader will render particle effects, UI elements, or overlay graphics together into a single map that is then used to calculate refractions!

heatwave_normalBuffer

The main render target is blitted to a fullscreen quad, and distorted by offsetting the UV coordinates during the copy based on the refraction vector calculated using the normal map, resulting in a nice realtime psuedo-refraction!

There are a few issues with this method, mainly that it doesn’t calculate “true” refractions. The effect is meant to look nice more than to make accurate calculations, so cool effects like refracting light around corners and computing caustics aren’t possible. The advantage however is that the effect operates in screen-space. The time required to render distortion is constant, and the cost of adding additional distortion sources is near zero, making it perfect for games, and situations where a large number of sources will be messing with light!

I’ve made a small asset-package so other Unity developers can download the sources and use them!

You can find the project on Github here!