
Atmosphere Propagation Graph from Project: Commander
I have a personal game project I’ve been contributing to now and again, and it seems to be slowly devolving into a case study of over-engineering. Today I’d like to talk about an extremely robust, and extremely awesome system I got working in the past few days.
The game takes place aboard a spaceship engaged in combat with another ship. The player is responsible for issuing orders to the crew, selecting targets, distributing power to subsystems, and performing combat maneuvers, all from a first-person perspective aboard a windowless ship (after all, windows are structural weaknesses, and pretty much useless for targets more than 10 km away anyway).
Being a game that takes place in space, oxygen saturation and atmospheric pressure is obviously a constant concern, and presents several dangers to the player. I needed a way I could model this throughout the ship in a convincing, and efficient way.
What and Why?
We need a solution that handles a degree of granularity (ideally controllable by a designer), is very fast to update, and can handle the ambiguity of characters who may be transitioning between two areas. How can this be done?
Enter “Environment Probes”. A fairly common technique in computer graphics is the use of environment probes to capture and sample shading information in an area surrounding an object. Usually, these are used for reflections and lighting, allowing objects to blend between multiple static pre-baked reflections quickly rather than re-rendering a reflection at runtime. This same concept could be made to work with arbitrary volumetric data, rather than just lighting, and would cover many of the requirements of the atmosphere system!
So, let’s say that a designer can place “atmosphere probes” in the game world. Huzzah, all is well, but how can that data actually be used practically? Not only do we need to propagate values between probes, but characters need to be able to sample their environment for the current atmosphere values at their position, where there may or may not be a probe! Choosing just the nearest probe will introduce noticeable “seams” between areas, and still doesn’t easily give us the adjacency data we need to propagate values from one probe to the next!
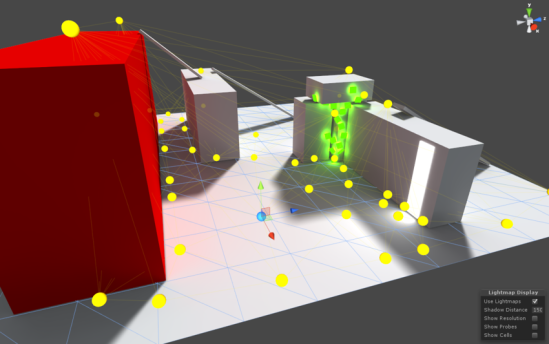
“Light Probes” in the Unity game engine. An artist can place probes around the environment (shown as yellow spheres), and have the engine pre-calculate lighting information at each sample.
Let’s look at the Unity game engine for inspiration. One of their newer rendering features is “Light Probe Groups”, which is used for lighting objects as described above. Their mechanism is actually quite clever. They build a Delaunay tetrahedralization of hand-placed probes, resulting in a mesh defining a series of tetrahedral volumes. These volumes can then be used to sample the probes at each of the four vertices, and interpolate the lighting data for the volume between them! In theory, this doesn’t have to just be for light. By simply generalizing the concept, we could theoretically place probes for any volumetric data!
Let’s Get Graphic!
I spent the majority of the time building a triangulation framework based on Bowyer-Watson point insertion. Essentially, we iteratively add in vertices one at a time, and check whether the mesh is still a valid Delaunay triangulation with each insertion. If any triangle fails to meet those constraints after the new vertex is inserted, it’s removed from the mesh, and rebuilt. This algorithm is quite simple conceptually, and works relatively quickly, making it a great choice for this system. Once this was working, it was quite simple to flesh it out in the third dimension.
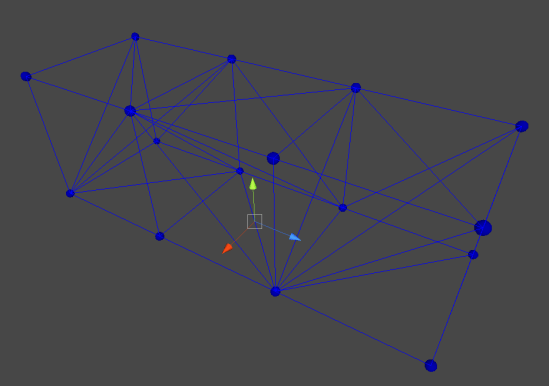
A simple Delaunay tetrahedralization of a series of “Atmosphere Probes”.
So now what? So far we have a volumetric mesh defined across a series of probe objects. What can we do with this?
Each probe has an attached “Atmosphere Probe” component which allows it to store properties about the air at that location. Pressure, oxygen saturation, temperature, you name it. This is nice in itself, but the mesh also gives us a huge amount of local information. For starters, it gives us a clear idea of which atmosphere probes are connected, and the distance between them. A few times every second, the atmosphere system will look at every edge in the graph and calculate the pressure difference between the two vertices it connects. Using the pressure difference, it will propagate atmosphere properties along that edge. We essentially treat each probe as a cell connected to its neighbors by edges, and design a fluid-dynamics simulation at a variable resolution. This means that the air at eye-level can be simulated accurately and used for all sorts of cool visual effects, while the simulation around the player’s ankles can be kept extremely coarse to avoid wasting precious iterations. By iterating through edges, we partially avoid the combinatorial explosion that would result from comparing every unique pair of graph vertices, and we can ensure that no cells will be “skipped over” when calculating flow.
Interpolation – Pretending To Know What We Don’t.
Now, how do we actually sample this data?! The probes are nice, but what if the player is standing near them, rather than on them? We want to smoothly interpolate data between these probes, so that we can sample the mesh volume at arbitrary locations. Here, we can dust off our old 2D friend, barycentric coordinates. Normally, we humans like to think in cartesian coordinates. We define a set of orthogonal directions as “Up”, “Forward”, and “Right”, and then express everything relative to those directions. “In front, and a little to the right of me…” but coordinate systems don’t always need to be this way! In theory, we could describe a location using any basis.
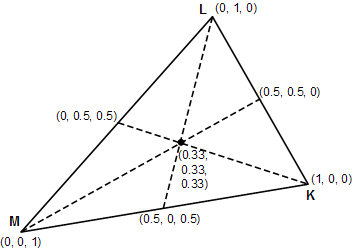
An example of a barycentric coordinate system. Each triplet shows the coordinates of that point within the triangle.
Barycentric coordinate systems define points relative to the positions of the vertices of any arbitrary simplex. So for a triangle, one could say “80% of vertex 1, 26% of vertex 2, and 53% of vertex 3”. Conveniently, these coordinates are also normalized, meaning that a point exactly at vertex 1 will be expressed as (1,0,0). We can therefore use these coordinates for interpolation between these vertices by performing a weighted sum of the values of all the vertices of the simplex, using their corresponding component of the coordinate vector of the sample point!
So, the value of the point at the center of the diagram would be equal to
x = 0.33M + 0.33L + 0.33K
or, the average of the values of each vertex!
By calculating the barycentric coordinates of the sample point within each tetrahedron, we can determine how to average the values of each corner to find the value of that point! For our application, by knowing which tetrahedron the player is in, we can simply find the coordinates of the player in barycentric space, and do a fancy average to determine the exact atmospheric properties at his or her position! By clamping and re-normalizing coordinates, this system will also handle extrapolation, meaning that, even if the player exits the volume of the graph, the sampled properties will still be fairly accurate!
Wait… you just said “by knowing which tetrahedron the player is in…” How do we do that? Well, we can use our mesh from before to calculate even more useful information! We can determine adjacency between tetrahedra by checking if they share any faces. If two tetrahedra share three vertices, we know they are adjacent along the face formed by those three vertices… wait, it gets better… remember we had barycentric coordinates for our sample point anyway. Barycentric coordinates are normalized, and “facing inward”, so if any of our coordinates are negative, we know that the sample point must be contained within the adjacent tetrahedron opposite the vertex for which the coordinate is negative.
We essentially get to know if our sample point is in another tetrahedron for “free”, and by doing some preprocessing, we can tell exactly WHICH tetrahedron that point is within for “free”.
https://gfycat.com/EachMessyFlatfish
In the final solution, the player maintains a “current tetrahedron” reference. Whenever the player’s coordinates within that tetrahedron go negative, we update that reference to be the tetrahedron opposite the vertex with the negative coordinates. As long as the player moves smoothly and doesn’t teleport (which isn’t possible in the game I was writing this for), this reference will always be correct, and the sampler will always be aware of the tetrahedron containing the player. If the player does teleport, it will only take a few frames for the current tetrahedron reference to “walk” its way through the graph and correct itself! I also implemented some graph bounding volume checks, so I can even create multiple separate atmosphere graphs, and have the player seamlessly walk between them!
Concavity!
The last step was ensuring that I could actually design levels the way I wanted. I quickly found that I was unable to properly design concave rooms! The tetrahedralization would build edges through walls, allowing airflow between separate rooms that should be blocked off from one-another. I didn’t want to do any geometric collision detection because that would quickly become more of a hassle, and fine-tuning doorways and staircases to allow air to flow through them is not something I wanted to bother with. Instead, I implemented “Subtraction Volumes”. Essentially a way for a level designer to hint to the graph system that a given space is impassible. Once the atmosphere graph is constructed, a post-pass runs through the tetrahedron data and removes all tetrahedra which intersect a subtraction volume. By placing them around the level, the designer can essentially cut out chunks of the graph where they see fit.
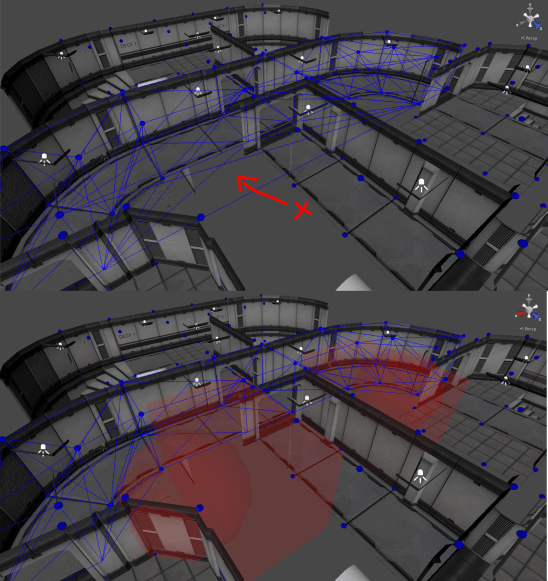
Notice in the first image there are edges spanning vertices on either side of what should be a wall. After sphere and box subtraction volumes are added, these edges are removed.
Looking Forward!
And that’s about it! Throwing that together, along with a simple custom editor in the Unity engine, I now have a great tool for representing volumetric data! In the future, I can generalize the system to represent other things, such as temperature or light-levels, and by saving the data used to calculate sample propagation, I can also determine the velocity of the air at any point for drawing cool particle effects or wind sound effects! For now, the system is finished, but who knows, maybe I’ll add more to it in the future 🙂
